Ultimate Video Enhancer (Sharpen, HDR, Color Boost)

Instantly improve every video on any website. Adds real-time sharpening, HDR boost, better colors and contrast to all HTML5 videos.

You will need to install an extension such as Tampermonkey, Greasemonkey or Violentmonkey to install this script.

You will need to install an extension such as Tampermonkey to install this script.

You will need to install an extension such as Tampermonkey or Violentmonkey to install this script.

You will need to install an extension such as Tampermonkey or Userscripts to install this script.

You will need to install an extension such as Tampermonkey to install this script.

You will need to install a user script manager extension to install this script.

(I already have a user script manager, let me install it!)

You will need to install an extension such as Stylus to install this style.

You will need to install an extension such as Stylus to install this style.

You will need to install an extension such as Stylus to install this style.

You will need to install a user style manager extension to install this style.

You will need to install a user style manager extension to install this style.

You will need to install a user style manager extension to install this style.

(I already have a user style manager, let me install it!)

Author
Freak288
Daily installs
2
Total installs
306
Ratings
1 0 0
Version
1.13.9
Created
2026-01-03
Updated
2026-05-19
Size
687 KB
License
N/A
Applies to
All sites


🔥 Make EVERY Video Look Better – Instantly


Your videos are not bad.
They are just not optimized.


This script upgrades every video on every website:

  • ✔ Sharper image
  • ✔ Better colors
  • ✔ Real contrast (no washed-out look)
  • ✔ HDR-like punch
  • ✔ Works everywhere instantly


No downloads. No effort.

Install → Press hotkey → Done.


⚠️ Once you try it, you won’t want to go back.


💡 What it actually does


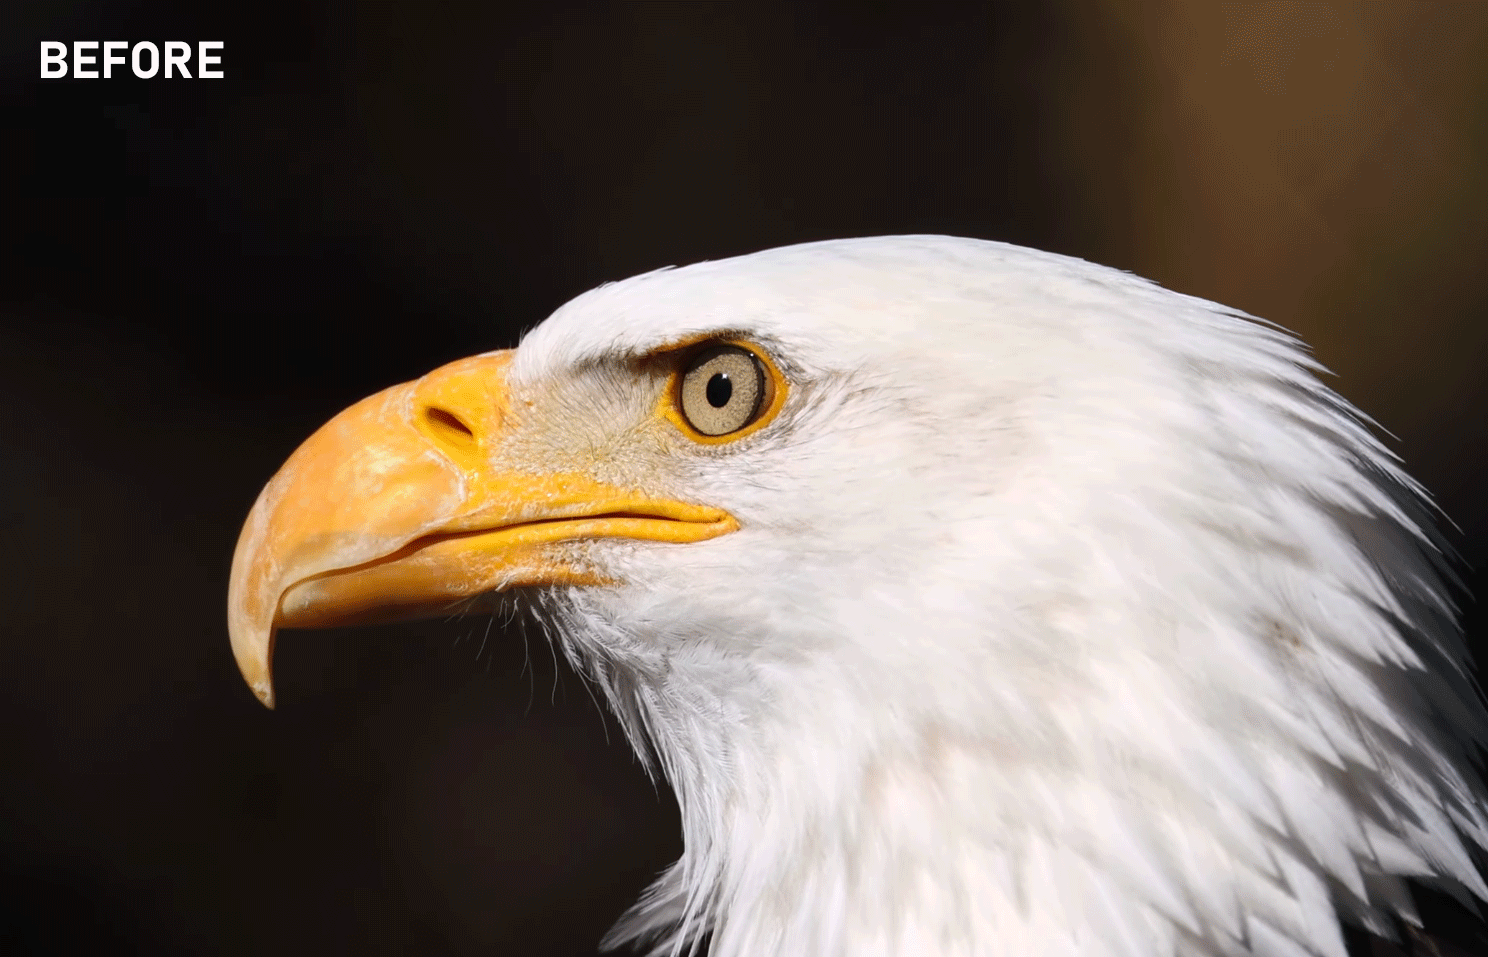
This script adds real-time video enhancement to every HTML5 video directly in your browser.


Whether it's YouTube, streams, anime, or gaming:
everything looks clearer, more vibrant, and more detailed instantly.


⚡ Why you need this

  • Most videos look flat or washed out
  • Streams lose detail due to compression
  • Your monitor can do more – the video just doesn’t use it


👉 This unlocks the full potential of every video.


🎯 Who is this for?

  • 🎬 Movies & Series → cinematic look
  • 🎮 Gaming → better visibility & contrast
  • 🎨 Anime → sharper lines & stronger colors
  • 💻 Streams → less blur, more detail


🚀 Core Features (simple)

  • Sharpen / Blur → make the image clearer or softer
  • Black & White Level → control shadows & highlights
  • HDR Boost → more punch and dynamic range
  • Color Styles → Dark & Moody, Teal & Orange, etc.
  • Auto-Scene-Match → auto-adjusts the image per scene
  • GPU Mode → faster and better for 4K


🎮 Controls (Hotkeys)

All shortcuts: CTRL + ALT + Key

  • B → Base enhancement
  • D → Dark & Moody
  • O → Teal & Orange
  • V → Vibrant
  • P → HDR
  • C → Switch profile
  • H → Toggle overlay
  • X → GPU Mode
  • I → Settings / JSON
  • G → User Profile Settings
  • S → Scopes HUD
  • A → Auto-Scene-Match


⚙️ Settings (optional)


If you want, you can fine-tune everything:
sharpness, colors, contrast, HDR, profiles, and more.


👉 Open the JSON menu with CTRL + ALT + I.

  • Edit your own values
  • Export / import settings
  • Modify profiles directly


📥 Load Example Settings


You can load ready-to-use example settings directly from the JSON menu.
Perfect if you want to test a strong look instantly.

  • Select an example → click Load
  • Then press Save → effect is applied instantly


⚠️ Important:

Some example profiles use LUTs (color grading files).
These must be loaded first.

  • 1. Open CTRL + ALT + G (LUT Profile Manager)
  • 2. Import the example LUTs
  • 3. Then load the example settings in JSON


👉 Without LUTs, some presets will not look as intended.


💡 Tip: Start with an example preset, then tweak it to your preference.


🧠 Auto-Scene-Match (Smart Feature)


The script analyzes the video in real-time and automatically adjusts:

  • Brightness
  • Contrast
  • Colors


👉 Result: consistently good image quality in every scene.


🧪 Advanced Features (for power users)

  • Scopes HUD (histogram, RGB analysis)
  • LUT support (PNG + .cube)
  • Custom SVG / GLSL / Canvas 2D filters
  • User Profile Manager (with ZIP import/export)
  • GPU Pipeline (WebGL rendering)
  • Edge Detection (detail enhancement)


📦 Example Profiles

My Profile (SVG)

GPU Profile


⚠️ IMPORTANT (Chrome / Edge)

  • 1. Enable Developer Mode (chrome://extensions)
  • 2. Enable "Allow userscripts" in Tampermonkey
  • 3. Restart your browser

More info


FeatureChromeFirefoxEdgeEdge (DRM)Opera
SVG filters
LUT profiles
Custom filters (SVG / WebGL / 2D)
WebGL / GLSL overlays
WebGL / GLSL overlays (DRM sites)
Edge detection / Denoise
Screenshot / Recording
Hotkeys (Ctrl+Alt+…)


Edge (DRM) — Sites like Netflix or Disney+ use Widevine L1 + Hardware-Compositing. Any filter causes a black screen, so all filters and hotkeys are automatically disabled.


DRM sites (all browsers) — Widevine blocks canvas readback on DRM-protected sites, disabling WebGL / GLSL overlays in every browser.


Firefox — WebGL2 canvas readback is blocked, disabling all GPU-based filters, overlays, screenshots and recordings.


🔥 Tip


Try it on a video and toggle it on/off.


👉 You will instantly see the difference.